How to Use the Google Indexing API to Get Indexed in Hours
Step-by-step guide to using the Google Indexing API for instant indexing. Real implementation details, gotchas, and fixes I learned building it.
By Mike Hodgen
Why Sitemaps Don't Work for Fast Indexing
I published a blog post last Tuesday at 9 AM. Submitted the sitemap to Google Search Console immediately. By Friday afternoon, it still wasn't indexed. This isn't a Google bug — it's working exactly as designed.
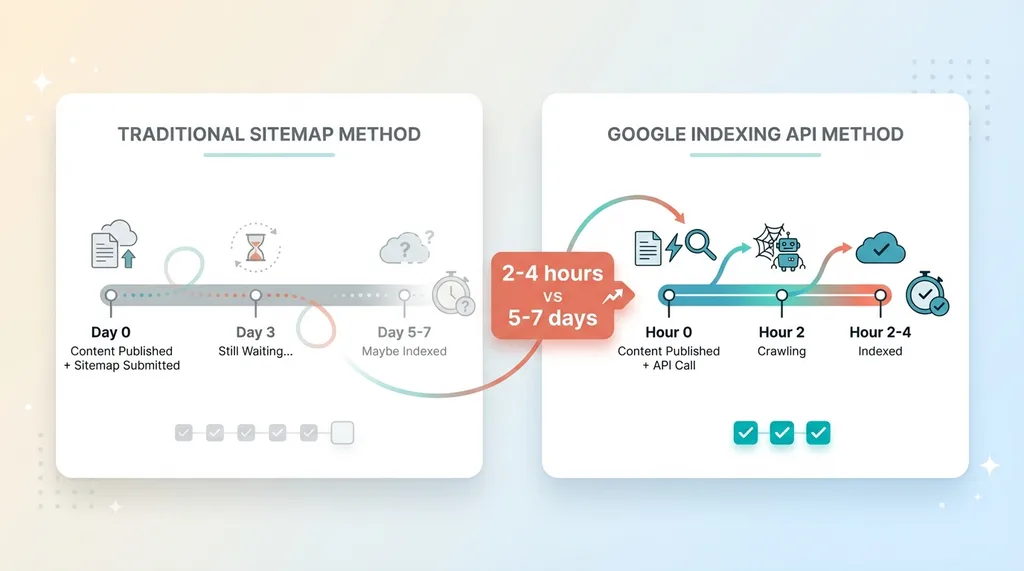 Sitemap vs Indexing API Speed Comparison
The Sitemap Myth
Most people treat sitemaps like a submission form. You add your URLs, ping Google, and assume they'll crawl it soon. That's not how it works. A sitemap is a suggestion, not a request. Google will get to it when they get to it — usually 3-7 days for new content, sometimes longer for sites without strong authority.
This matters when you're publishing regularly. If you're running automated blog systems that create content daily, waiting a week for indexing means a week of zero search traffic. You're producing faster than Google is discovering.
When Google Actually Crawls Sitemaps
Google crawls sitemaps on their schedule, not yours. They consider site authority, crawl budget, and how frequently you typically publish. A new site publishing its first blog post? Could be two weeks. An established site with daily updates? Maybe 2-3 days. But it's always a maybe.
I've seen patterns in our data at my DTC fashion brand. Product pages with high-authority backlinks get indexed in 24-48 hours even without API intervention. Blog posts on new topics? Five days average. Seasonal content published off-season? Sometimes a week.
What Indexing API Actually Does
The Google Indexing API is different. It's a direct API call to Google that says "crawl this URL now." You're not suggesting. You're requesting immediate attention.
The API was originally built for job postings and livestream events — time-sensitive content where waiting days defeats the purpose. Google quietly made it available for any site, but buried the documentation so deep that most developers don't know it exists.
When I submit a URL through the Indexing API, it typically gets indexed within 2-4 hours. Sometimes faster. The difference isn't subtle — it's the difference between traffic today and traffic next week.
This article walks through exactly how to set this up. I'll show you the code I use for hodgen.ai, the gotchas that wasted hours of my time, and why most implementations fail at the verification step.
What You Need Before You Start
This isn't a no-code solution. You need some technical comfort, but you don't need to be a backend engineer. If you can follow instructions and paste code into a terminal, you're good.
Google Cloud Project Setup
You need a Google Cloud Platform account. The free tier works fine — you won't hit billing thresholds unless you're submitting thousands of URLs daily (which you can't anyway because of rate limits). If you've never touched GCP, expect to spend 15 minutes creating an account and navigating the console. It's not intuitive, but it's documented.
You'll create a project specifically for this. I recommend naming it something obvious like "indexing-api-production" so you don't confuse it with other projects six months from now.
Domain Ownership Verification
This is where it gets important: you must verify domain ownership with Google. Not just in Google Search Console — that's not enough for API access. You need explicit verification through the Site Verification API.
Most guides skip this or handle it incorrectly. They tell you to add your service account email as an owner in Google Search Console and assume that's sufficient. Sometimes it works. Often it doesn't. The API returns 403 Forbidden and you waste hours debugging authentication when the real issue is verification.
The Gotcha Nobody Tells You About
Being an Owner in Google Search Console does NOT automatically mean you have verified ownership for API purposes. These are separate systems. Your personal Google account might own the property in Search Console, but your service account — the programmatic identity making API calls — needs its own verification.
This is the step that breaks 80% of implementations. People enable the APIs, create service accounts, download credentials, write code, test it, and get permission errors. They assume the code is wrong. The code is fine. The service account isn't verified.
I'll walk through the correct verification method in Section 4. For now, just know: if you skip explicit verification with the Site Verification API, nothing else will work.
Step-by-Step: Setting Up Google Cloud Project
Open the Google Cloud Console. If you don't have an account, create one. You'll need to add a payment method even for the free tier, but you won't be charged unless you exceed very high limits.
Create the GCP Project
Click the project dropdown in the top navigation. Click "New Project." Name it something you'll recognize. The project ID will auto-generate — you can customize it if you want, but the default is fine. No organization is required. Click "Create."
Wait 30 seconds for project creation. The console will auto-switch to your new project. If it doesn't, manually select it from the project dropdown.
Enable the Right APIs
Navigate to "APIs & Services" > "Library" from the left menu. This is where you enable specific Google APIs for your project.
Search for "Web Search Indexing API." Click it. Click "Enable." This gives you access to submit URL notifications.
Go back to the library. Search for "Site Verification API." Enable it. This is the missing piece in most guides — you need it to programmatically verify domain ownership.
Both APIs should now show as enabled under "APIs & Services" > "Dashboard."
Create a Service Account
Service accounts are programmatic identities. They're not tied to your personal Google account, so they can run in automated systems without needing you to log in.
Navigate to "IAM & Admin" > "Service Accounts." Click "Create Service Account."
Name it something like "indexing-api-service." The service account ID will auto-generate an email address: indexing-api-service@your-project-id.iam.gserviceaccount.com. You'll need this email later.
Click "Create and Continue." For role, select "Owner." Yes, Owner is broad permissions, but both the Indexing API and Site Verification API require it. You can try more restrictive roles if you want to lock this down, but Owner works reliably.
Click "Continue," then "Done."
Download Your JSON Key
Find your new service account in the list. Click the three-dot menu on the right. Select "Manage Keys."
Click "Add Key" > "Create New Key." Choose JSON format. Click "Create."
A JSON file will download to your computer. This file contains your service account's credentials. Treat it like a password — don't commit it to GitHub, don't email it, don't leave it in Downloads forever.
I keep mine in a secure credentials directory outside my main code repository. In production systems, I use environment variables or secret management services, but for initial setup, a secure local file works.
The JSON contains a private_key, client_email, and other metadata. You'll use this file to authenticate API requests.
Verifying Domain Ownership (The Hard Way That Actually Works)
This section is why your implementation will work and most others fail.
Why GSC Owner Isn't Enough
You might already be an owner of your domain in Google Search Console. Great — that proves ownership to your personal Google account. The service account you just created is a different identity. It needs its own proof of ownership.
Some guides say: "Just add the service account email as an owner in Google Search Console." I tried this. Sometimes it works. Sometimes the API still returns 403 Forbidden errors because the verification handshake didn't complete properly.
The reliable method is explicit verification through the Site Verification API.
Using Site Verification API
The Site Verification API lets you programmatically verify ownership by adding a DNS TXT record. This is the same method you'd use manually in Search Console, but done via API so the verification is explicitly tied to your service account.
First, you need to get a verification token. This is a unique string that Google generates for your domain and service account combination. You'll make an API call to request this token.
The request looks like this: GET to https://www.googleapis.com/siteVerification/v1/token with a JSON body specifying your site URL and verification method (DNS_TXT).
Google responds with a token string. Copy it.
The TXT Record Method
Go to your DNS provider (Cloudflare, Namecheap, Route53, wherever you manage DNS). Add a new TXT record:
- Host/Name: Usually
@or leave blank for root domain - Value: The token string from the API response
- TTL: Default is fine (usually 300-3600 seconds)
Save the record. DNS propagation usually takes 1-5 minutes, but can take up to an hour depending on your provider.
Once the TXT record is live, you verify ownership by making another API call: POST to https://www.googleapis.com/siteVerification/v1/webResource?verificationMethod=DNS_TXT with a JSON body containing your site URL.
If successful, Google confirms verification and associates it with your service account. Now when your service account makes Indexing API calls, Google recognizes it as a verified owner.
I verify this explicitly before running any indexing automation. One quick API call to the Site Verification API confirms ownership status. If it's not verified, I don't bother with indexing calls — they'll just fail.
This is the step that cost me three hours the first time I set this up. Every guide said "add the service account to Search Console" and I assumed that was sufficient. It wasn't. Explicit verification through the Site Verification API is the only reliable method I've found.
Submitting URLs to the Indexing API
Once verification is done, the actual indexing call is straightforward.
The API Request Structure
You make a POST request to https://indexing.googleapis.com/v3/urlNotifications:publish with a JSON body:
{
  "url": "https://hodgen.ai/blog/example-post",
  "type": "URL_UPDATED"
}
The type field can be URL_UPDATED (for new or changed content) or URL_DELETED (to remove from index). You'll use URL_UPDATED 99% of the time.
The request must include authentication via your service account credentials. This is where the JSON key file you downloaded comes in.
Python Example That Works
I use Python for this because the google-auth library handles OAuth2 credentials cleanly. Here's working code:
from google.oauth2 import service_account
import requests
import json

# Load service account credentials
credentials = service_account.Credentials.from_service_account_file(
    'path/to/your/service-account-key.json',
    scopes=['https://www.googleapis.com/auth/indexing']
)

# Authorize the credentials
authed_session = requests.Session()
authed_session.headers.update({
    'Authorization': f'Bearer {credentials.token}'
})

# Submit URL
url_to_index = "https://hodgen.ai/blog/example-post"
api_endpoint = "https://indexing.googleapis.com/v3/urlNotifications:publish"

payload = {
    "url": url_to_index,
    "type": "URL_UPDATED"
}

response = authed_session.post(api_endpoint, json=payload)

if response.status_code == 200:
    print(f"Successfully submitted {url_to_index}")
else:
    print(f"Error {response.status_code}: {response.text}")
Install dependencies: pip install google-auth requests.
Replace 'path/to/your/service-account-key.json' with the actual path to your downloaded JSON file.
Run it. If verification is correct, you'll get a 200 response and Google will crawl the URL within hours.
Handling Rate Limits
The Google Indexing API allows 200 requests per day per project. That's the hard limit. If you exceed it, you'll get 429 rate limit errors and have to wait until the next day.
For regular publishing — a few blog posts per day, product updates, news articles — 200 is plenty. For bulk indexing thousands of pages, it won't work. You'd need to spread requests across multiple days or multiple GCP projects (which gets messy).
I batch my requests when publishing multiple URLs at once. The API doesn't have a native batch endpoint, but you can loop through URLs with error handling to catch failures individually.
Common errors:
- 403 Forbidden: Verification issue. Your service account isn't recognized as an owner.
- 429 Too Many Requests: You hit the 200/day limit.
- 400 Bad Request: Malformed JSON, usually a typo in the URL or type field.
All of these are in the response body. Log them. Don't silently fail.
Common Problems and How I Fixed Them
These are real issues I hit while building this for hodgen.ai. They're not in any official documentation.
GCP Organization Policy Restrictions
If you're working within a company GCP organization (not a personal account), organization policies might block you from enabling APIs. You'll see a permissions error even though you're a project owner.
The fix: use gcloud CLI to enable APIs locally with your user credentials, which can bypass some org policy restrictions. Run:
gcloud services enable indexing.googleapis.com
gcloud services enable siteverification.googleapis.com
If that still fails, you need owner-level access at the organization level, or you need to create a separate personal GCP project outside the org structure.
Application Default Credentials Issues
When using Google's authentication libraries, they sometimes default to Application Default Credentials (ADC), which can pull from the wrong project for quota tracking. I hit this when my service account was in project A, but ADC was using project B's quota.
Fix by explicitly setting quota_project_id in your credentials:
credentials = service_account.Credentials.from_service_account_file(
    'path/to/key.json',
    scopes=['https://www.googleapis.com/auth/indexing']
).with_quota_project('your-project-id')
This ensures API usage is billed/tracked to the correct project.
Quota Project Errors
Related to the above: if you see errors like "quota project not found" or "quota exceeded" when you know you haven't used 200 requests, check which project is tracking your usage.
Go to GCP Console > "APIs & Services" > "Dashboard" > select the Indexing API > view usage metrics. If it shows zero usage but you've been making calls, they're being tracked elsewhere.
The quota project must match the project where the service account was created. If you're using the same service account across multiple projects (don't do this), you'll confuse quota tracking.
Verification Timing
DNS propagation isn't instant. After adding the TXT record, wait 2-5 minutes before attempting verification via the API. I've had verifications fail because I tested immediately after saving the DNS record.
You can check propagation with dig:
dig TXT yourdomain.com
Look for your verification token in the response. If it's not there yet, wait longer.
Also: the Site Verification API doesn't give clear error messages. If verification fails, it usually just says "verification failed" without specifying why. Double-check the token matches exactly, the DNS record is on the root domain (not a subdomain unless that's what you're verifying), and enough time has passed for propagation.
What I Built With This (And What You Can Too)
I use the Google Indexing API for every blog post published on hodgen.ai. The publishing pipeline is automated: content gets generated, reviewed, formatted, pushed live, and immediately submitted for indexing.
Before this, I was publishing 2-3 posts per week and waiting 4-6 days for Google to index them. Now they're indexed in 2-4 hours. That's 4-6 days of search traffic I wasn't getting before.
This matters when you're writing about time-sensitive topics — industry news, new tools, current trends. If you publish Monday and Google indexes Friday, the conversation has moved on. Your content is already stale.
The 200 requests per day limit isn't restrictive for regular publishing. We publish 3-5 posts per week. That's 15-25 requests per month. The limit is 6,000 per month. Not even close.
Where the limit becomes real: bulk indexing. If you're launching a new site with 500 pages and want them all indexed immediately, you're looking at 2-3 days of steady requests. For most businesses, that's fine — you're not launching 500 pages overnight anyway.
This API is one component of a larger SEO automation system I built. The automated blog system handles content creation, keyword research, and publishing. Indexing API integration is the final step — ensuring Google sees the content fast.
If you're thinking about building something similar — automated publishing with immediate indexing — this is the foundation. The hard part isn't the API calls. It's the verification, the error handling, and the integration with your existing content pipeline.
I've built this for my DTC brand's product launches, for blog automation on hodgen.ai, and for client systems where fresh content needs to hit search fast. The setup takes a few hours the first time. After that, it's fire-and-forget.
The natural next question: what else can you automate beyond just indexing? Product descriptions, pricing updates, SEO metadata, structured data — all of this can be dynamic and API-driven. That's the kind of system I build as a Chief AI Officer: the whole stack, end-to-end, designed to eliminate manual work and get results faster.
Thinking About AI for Your Business?
If this resonated — if you're already thinking about what else you could automate beyond just indexing — let's have a conversation.
I do free 30-minute discovery calls where we look at your operations and identify where AI could actually move the needle. Not consulting fluff. Real systems that save time and generate revenue.
No hard sell. Just a conversation with someone who's built this stuff in production.
Or if you want to see what a full engagement looks like: Work with me.
Get AI insights for business leaders
Practical AI strategy from someone who built the systems — not just studied them. No spam, no fluff.
Hodgen.AI
Ready to automate your growth?
Book a free 30-minute strategy call with Hodgen.AI.
Book a Strategy Call