AI Image Optimization: How I Cut 92% Off My Site's Weight
Real numbers from production: 41.3MB saved, 500KB PNGs to 14KB WebPs. How I built an AI image optimization pipeline that runs automatically.
By Mike Hodgen
The Problem: Your Images Are Killing Your Site (And You Don't Know It)
I just saved 41.3MB across 69 images on hodgen.ai. That's a 92% reduction in image weight.
These weren't obviously bloated files. They were screenshots from blog articles, hero images for case studies, diagrams explaining AI systems. Normal website images. But they were massive — 500KB to 1.2MB PNGs that now sit comfortably at 14-116KB as WebPs.
Here's what happened: I took screenshots on a Retina display. Photoshop exported them at maximum quality. I dragged them into the CMS and assumed the platform would optimize them. It didn't. Most CMSs don't.
This is textbook image bloat, and it's everywhere. Designers prioritize visual perfection. Developers are shipping features, not optimizing assets. Marketing teams need that blog post live by EOD. Nobody has time to run images through a compression tool, and everyone assumes someone else handled it.
If a small consultancy site like mine had 41.3MB of waste, what does your product catalog look like? Your blog? Your landing pages?
What 41.3MB of waste looks like
Before optimization, a single blog post hero image: 1.2MB. After: 116KB. Same visual quality to the human eye.
Screenshots explaining technical concepts: 500-800KB PNGs. After conversion to WebP: 40-60KB. One-tenth the size.
Product mockups and interface demos: 300-600KB. After: 25-45KB.
The pattern was consistent. PNG exports from design tools were the worst offenders — they preserve every pixel at maximum fidelity, which is necessary for print or archival purposes but completely overkill for web delivery.
The math is brutal. A blog article with five images at 500KB each loads 2.5MB of image data before showing a single word of content. On a fast connection, that's annoying. On 4G in a rural area or a congested network, that's a bounce.
Why designers and developers keep uploading massive PNGs
Nobody wakes up wanting to ship 1MB images. But the workflow is broken.
Designers export at max quality because compression artifacts are their nightmare. They'd rather be safe than sorry. Tools like Photoshop and Figma default to high-quality PNGs or JPEGs because that's what looks best in isolation.
Developers inherit these files and have three options: manually compress each one (time-consuming), trust the CMS to handle it (often doesn't), or ship it as-is and move on to the next ticket. Guess which happens most often.
Marketing and content teams don't even know this is a problem. They see the image preview looking crisp in the editor and hit publish. The fact that it's 800KB doesn't register — file size isn't visible in most CMSs.
This is exactly why AI image optimization should be one of the first systems small businesses automate. It's high-impact, low-risk, and once it's built, it runs forever. I wrote about this in my piece on 5 AI systems every business should build first — image optimization consistently ranks in the top three for ROI.
Why Image Weight Actually Matters (Beyond Feel-Good Metrics)
Smaller images feel like good housekeeping. They're actually a ranking signal.
Core Web Vitals — specifically Largest Contentful Paint (LCP) and Cumulative Layout Shift (CLS) — are direct Google ranking factors. LCP measures how long it takes for the largest visible element (usually an image) to load. If your hero image is 1.2MB, your LCP is slow. Slow LCP means lower rankings.
This isn't speculation. Google documented this in 2021 when they rolled out the Page Experience update. Sites with good Core Web Vitals got a ranking boost. Sites with poor vitals got demoted.
Core Web Vitals are a ranking signal
LCP should be under 2.5 seconds. If your above-the-fold image is 800KB and the user is on a 3G connection, you're already past 4 seconds before the image even renders. That's a failed metric.
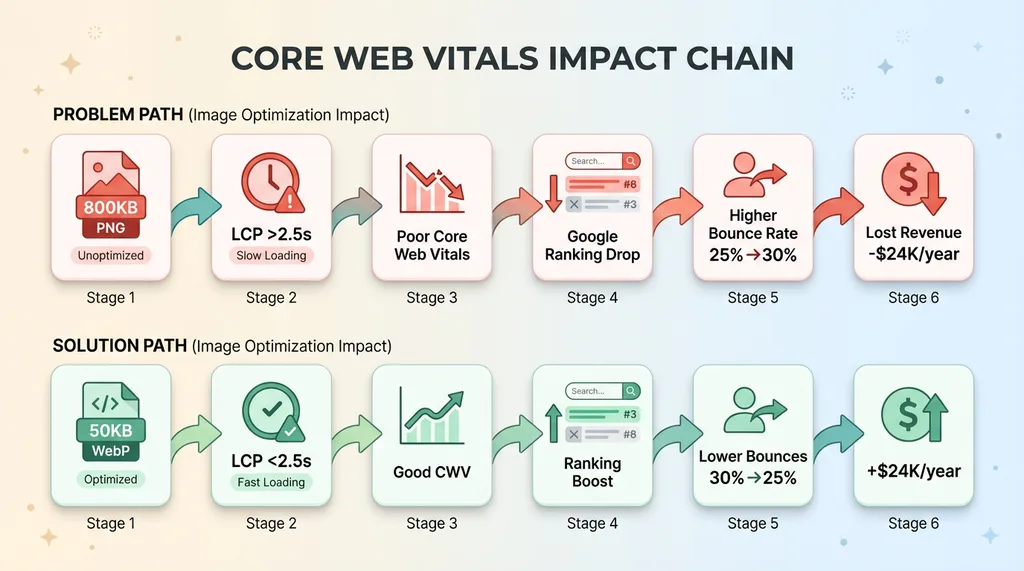 Core Web Vitals Impact Chain
CLS measures layout instability — images without defined dimensions cause the page to jump as they load. Oversized images make this worse because the browser has to reflow the layout when the actual dimensions are discovered.
Optimized images load faster, which improves LCP. Properly sized images reduce unexpected layout shifts, which improves CLS. Better Core Web Vitals mean better rankings. It's that direct.
Mobile users on slow connections
Desktop testing on gigabit fiber is a lie. Most of your traffic is mobile, and most mobile traffic is not on 5G in a major metro.
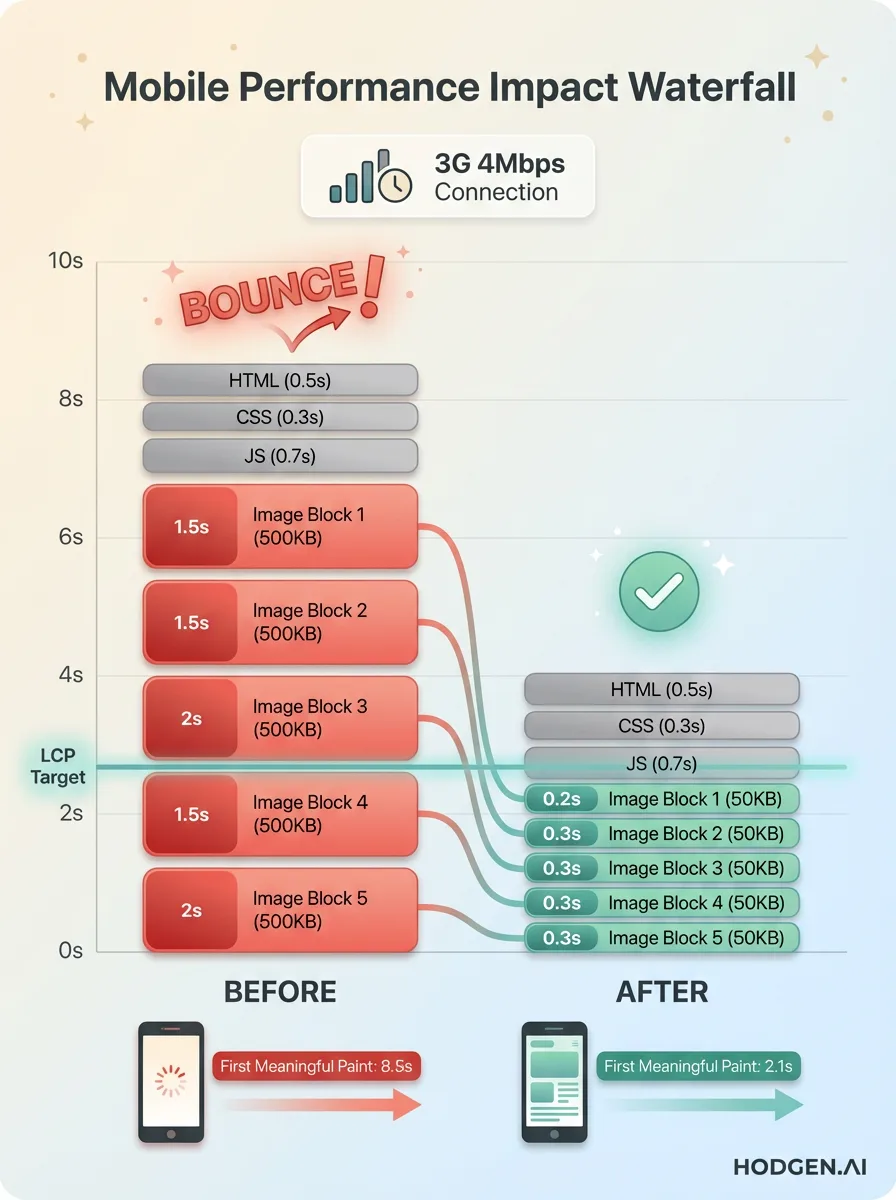 Mobile Performance Impact Waterfall
A 500KB image on a 3G connection (4Mbps download) takes 1 second to download, plus rendering time. Add in latency and congestion, and you're at 1.5-2 seconds for a single image. If your page has five images like that, you're looking at 8-10 seconds before meaningful content appears.
Users don't wait 8 seconds. They bounce.
Mobile performance isn't about users in San Francisco on 5G. It's about users on trains between cities, in rural areas with spotty coverage, in countries where 4G isn't guaranteed. If your site doesn't load on those networks, you're excluding a huge percentage of potential customers.
The real cost: bounces and lost revenue
Slow sites lose money. The data is everywhere.
Amazon found that every 100ms of latency cost them 1% in sales. Google found that a 500ms delay in search results reduced traffic by 20%. Walmart found that every 1 second improvement in load time increased conversions by 2%.
Your numbers will be different, but the direction is the same. Faster sites convert better.
Here's the cascade: bloated images cause slow load times, slow load times cause bounces, bounces cause lost sales or leads. For an ecommerce site with 10,000 monthly visitors and a 2% conversion rate, a 10% reduction in bounces (from speed improvements) adds 20 conversions per month. If average order value is $100, that's $2,000/month. $24,000/year. From compressing images.
This isn't theory. It's math.
What I Built: The 80/20 of Automated Image Processing
I didn't build a machine learning model that generates images. I built a pipeline that finds bloated images, converts and compresses them, and enforces quality standards. It took a day to set up and now runs automatically.
The goal was simple: reduce image file sizes without visible quality loss. No manual work after initial setup.
Detection: finding the bloated images
The first step is scanning the site to find images that exceed a threshold. I set mine at 200KB — anything larger gets flagged for optimization.
The script walks through the site's image directories, checks file sizes, and builds a list of targets. It also logs original sizes so I can measure savings later.
This sounds trivial, but most sites don't have visibility into their image inventory. You'd be surprised how many 1MB+ images are buried in old blog posts or forgotten product pages.
Processing: resize, convert, compress
Once the bloated images are identified, the pipeline does three things:
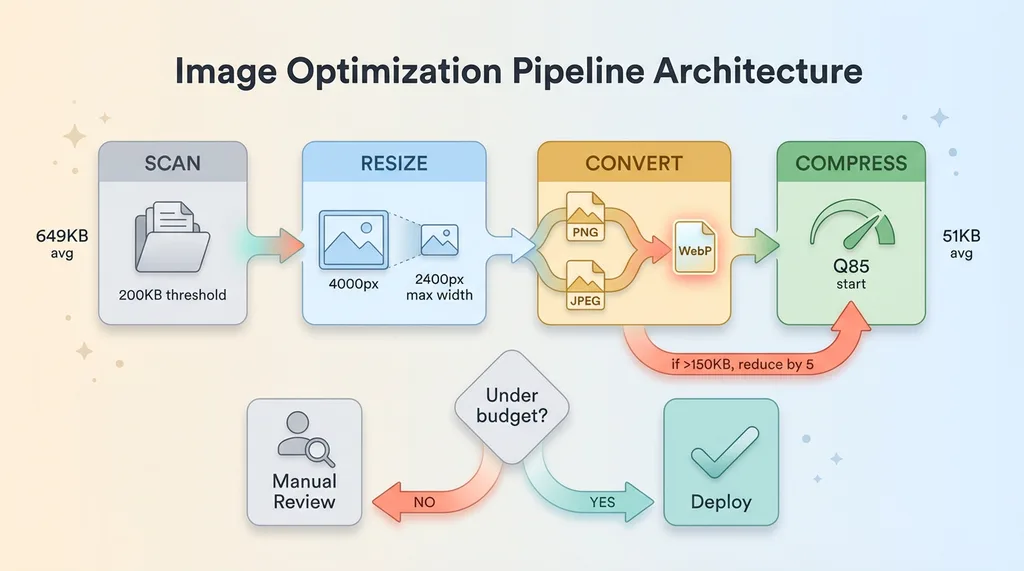 Image Optimization Pipeline Architecture
First, resize. Modern displays are high-DPI, but you don't need a 4000px-wide image for web delivery. I set a max width of 2400px — enough for Retina displays, small enough to avoid waste. Images larger than that get resized proportionally.
Second, convert. PNGs and JPEGs get converted to WebP, which offers better compression with the same visual quality. I'll explain why WebP specifically in a later section.
Third, compress. This is where quality settings matter. I use a base quality of 85 for photographic images and 90 for graphics or screenshots. These settings preserve visual fidelity while cutting file sizes dramatically.
The actual implementation uses Python and the Pillow library. The processing logic is straightforward: open the image, resize if needed, convert to WebP, save with the specified quality setting. About 50 lines of code.
Quality control: size budgets and visual thresholds
The key insight: don't just apply a fixed quality setting and call it done. Set a size budget and adjust quality dynamically to hit it.
For hodgen.ai, I set a budget of 150KB per image. The pipeline starts at quality 85, saves the file, checks the output size. If it's over budget, it reduces quality by 5 and tries again. If it can't hit the budget without dropping below quality 60, it flags the image for manual review.
This prevents two problems. First, it avoids over-compression artifacts on images that don't compress well. Second, it catches edge cases where WebP isn't the right format (transparency requirements, certain graphic types).
I borrowed this approach from the AI product pipeline I built for my DTC fashion brand. That system automates product creation with quality gates at every step — if something doesn't meet standards, a human reviews it. Same philosophy here: automate the common cases, escalate the exceptions.
The result: 90% of images process automatically and meet quality standards. The other 10% get manual attention. That's an 80/20 win.
Real Results From My Own Site
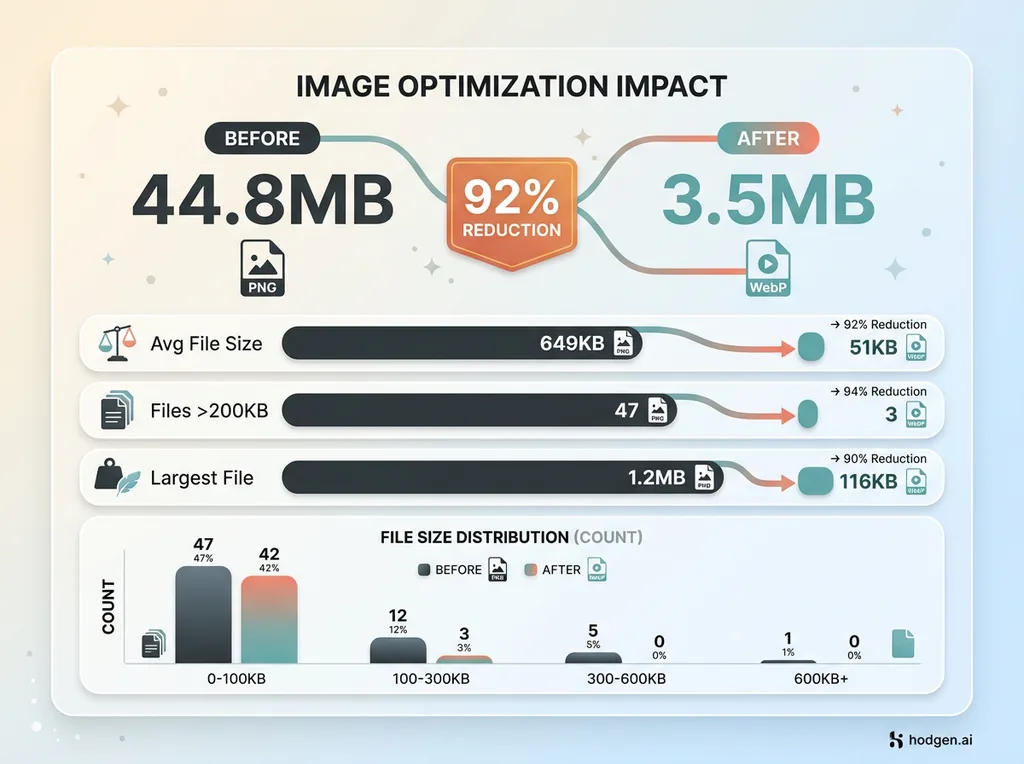
Numbers: 41.3MB saved across 69 images. That's 92% less data transferred to users on every page load.
The numbers: 41.3MB saved, 92% reduction
Before optimization, total image weight: 44.8MB. After: 3.5MB.
 Before/After Image Weight Comparison
Average file size before: 649KB. After: 51KB.
The distribution tells the story. Before optimization, 47 images were over 200KB. After, only 3 were (and those were intentionally preserved at higher quality for specific reasons).
Largest individual savings: a 1.2MB hero image compressed to 116KB. A 90% reduction with no visible quality difference.
Most images landed in the 14-60KB range after optimization. That's small enough to load instantly on any connection, large enough to look crisp on high-DPI displays.
Which images saw the biggest wins
Screenshot PNGs were the clear winners. These are images of interfaces, diagrams, code samples — typically exported from design tools at maximum quality.
Before: 500-800KB. After: 35-60KB. Often 90%+ reductions.
The reason: PNGs are lossless and preserve every pixel. WebP uses lossy compression (at quality 85-90) that's imperceptible to the human eye but dramatically more efficient. Screenshots don't need lossless compression. They need to be readable. WebP delivers that at a fraction of the size.
Hero images and blog post headers were the second-biggest category. These are large, photographic images — product shots, office photos, abstract backgrounds.
Before: 600KB-1.2MB. After: 80-150KB. The absolute savings here were huge, even if the percentage reduction was smaller than screenshots.
What didn't compress well (and why)
Not every image hit the 150KB budget. Three categories struggled:
First, images with transparency requirements. WebP supports transparency, but in some cases the alpha channel caused artifacts or the output size ballooned. I kept these as optimized PNGs.
Second, highly detailed graphics with fine lines or text. At quality 85, WebP sometimes introduced subtle artifacts around sharp edges. I bumped these to quality 95 or kept them as PNG.
Third, images that were already optimized. A handful of images came in at 60-80KB as JPEGs. Converting to WebP saved 10-20KB — not nothing, but not worth the effort if they were already performing well.
Acknowledging these exceptions is important. This isn't a magic bullet. It's an 80/20 solution that handles the majority of cases automatically and flags the rest for human judgment.
I didn't measure LCP before and after on hodgen.ai because the site is small and traffic is low. But the math is obvious: cutting 41.3MB of image weight directly improves load times, especially on mobile. For a high-traffic ecommerce site, this would translate to measurable improvements in Core Web Vitals and conversion rates.
Why WebP (And Not AVIF or JPEG XL Yet)
Format choice matters. I chose WebP because it's the pragmatic option in 2025.
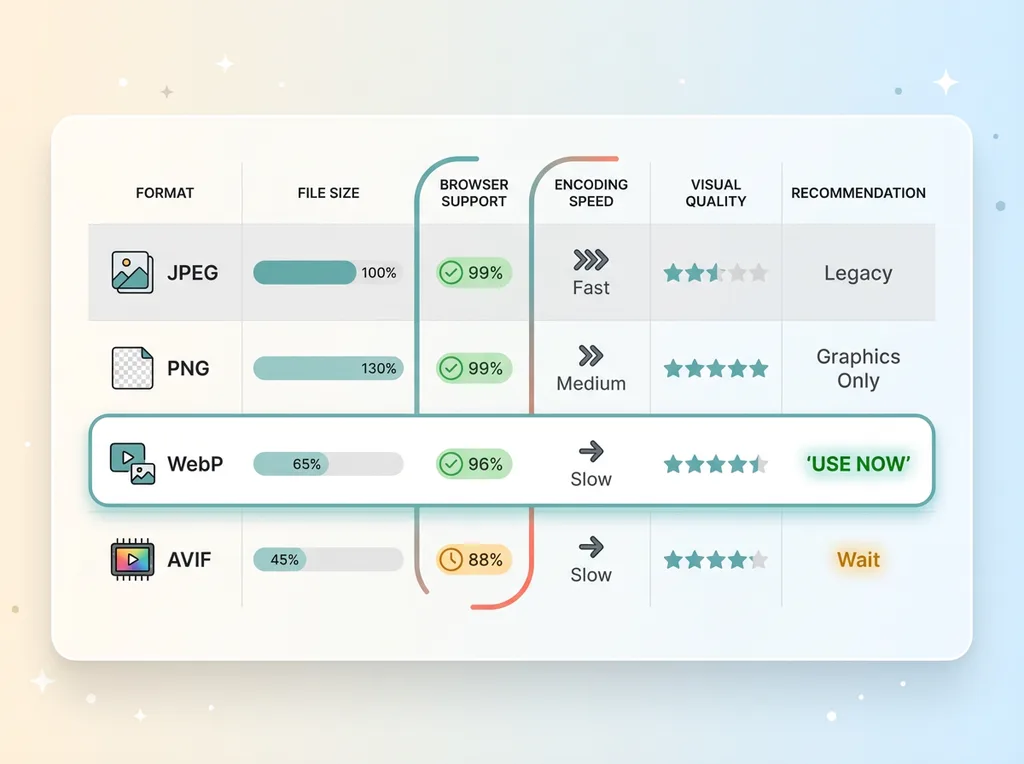 Image Format Comparison Matrix
WebP has 96%+ browser support. Safari added it in 2020, which was the last holdout. Chrome, Firefox, Edge — all native support. If you're delivering WebP today, 96% of users can view it without fallbacks.
The compression is excellent. WebP produces 25-35% smaller files than JPEG at equivalent visual quality. Compared to PNG, the savings are even larger — 26% smaller on average, but in practice I've seen 80-90% reductions on certain image types.
AVIF is technically superior. It offers better compression than WebP — 20-30% smaller files at the same quality. But browser support is still spotty at 88%. More importantly, encoding speed is much slower. For a batch optimization script processing hundreds of images, that matters.
JPEG XL is a mess. Safari supports it. Chrome dropped support in 2023. Firefox has it behind a flag. There's no consensus, and until there is, it's not a viable production format.
The pragmatic choice: use WebP today, keep an eye on AVIF for future adoption. When AVIF hits 95%+ support and encoding tools mature, switch. Until then, WebP is the clear winner.
One note on fallbacks: you can serve WebP with JPEG or PNG fallbacks using the <picture> element. This was necessary in 2019. In 2025, with 96% support, I don't bother. The 4% of users on ancient browsers get a broken image icon, and frankly, if they're running a browser that old, they have bigger problems than my images.
For most business sites, WebP-only is fine.
How to Build This Yourself (Or Get It Done)
Three paths to automated image optimization. Pick based on your technical comfort and scale.
The DIY route: Python + Pillow
If you're comfortable with Python, this is 100-150 lines of code.
You need Python 3.11+ and the Pillow library (pip install Pillow). The script logic:
- Scan image directories, build list of files over threshold (e.g., 200KB)
- For each file: open with Pillow, resize to max width if needed, convert to WebP, save with quality setting
- Check output size against budget. If over, reduce quality and retry.
- Log original and new file sizes for reporting.
- Replace original files with optimized versions (keep backups first).
Run this as a pre-deploy script in your CI/CD pipeline, or as a cron job that processes new images weekly.
The advantage: full control. You decide thresholds, quality settings, size budgets. You own the code and can customize it for edge cases.
The downside: you have to write and maintain it. If you're not technical, this isn't your path.
The tools route: ImageOptim, Squoosh, CDN services
Don't want to code? Use existing tools.
For batch processing on Mac, ImageOptim is excellent. Drag a folder of images, it compresses them automatically using WebP and other formats. Free, fast, works offline.
For one-off optimization, Google's Squoosh is a web app that lets you tweak quality settings and see real-time previews. Good for edge cases where you need manual control.
For automatic optimization at scale, consider a CDN with built-in image processing. Cloudflare Images, Imgix, or Cloudinary can resize, convert, and compress images on-the-fly based on the requesting device. You upload the original once, and the CDN serves optimized versions automatically.
The advantage: no code, works immediately. Cloudflare Images costs $5/month for 100,000 images. Imgix and Cloudinary are pricier but offer more features.
The downside: ongoing cost, less control. You're trading convenience for monthly fees and vendor lock-in.
The done-for-you route: hire someone who's built this before
If you're not technical and don't want to learn, hire a developer or AI consultant who's built image optimization pipelines.
This is usually a day's work to set up. A good implementer will write the script, integrate it into your workflow, document the process, and train your team on exceptions.
I build systems like this for clients — image optimization is often the first automation we deploy because it's high-impact and low-risk. The pipeline runs forever once it's set up. Every new image you upload gets optimized automatically.
Cost depends on complexity and scale. For a small site with straightforward requirements, expect $1,000-$2,000. For a large ecommerce catalog with custom requirements, more like $5,000-$10,000.
The advantage: done right the first time, integrated into your existing workflow, maintained by someone who knows what they're doing.
The downside: upfront cost. But compare that to ongoing CDN fees or the opportunity cost of never fixing the problem.
Pick the path that matches your resources. If you're technical, DIY. If you value convenience, use tools or a CDN. If you want it done once and done right, hire someone.
What You're Actually Buying With Image Optimization
You're not buying smaller files. You're buying faster load times, better mobile UX, higher SEO rankings, fewer bounces, and more conversions.
This is a one-time effort with permanent payoff. Once the pipeline is built, every new image gets optimized automatically. Every page benefits. Every user gets a faster experience.
Compare this to other performance optimizations. Code splitting requires ongoing maintenance as your codebase evolves. Lazy loading needs careful implementation to avoid layout shift. CDN configuration is complex and vendor-specific.
Image optimization is usually the highest-impact, lowest-effort win. Most sites have hundreds or thousands of unoptimized images. Fixing them improves performance immediately and measurably.
The ROI is straightforward. Faster load times reduce bounces. Lower bounce rates improve conversion rates. Better Core Web Vitals improve SEO rankings. Higher rankings drive more organic traffic. More traffic with better conversion rates means more revenue.
For an ecommerce site, the math looks like this: if image optimization improves load times by 2 seconds, and that reduces bounce rate by 5%, and your site has 50,000 monthly visitors with a 2% conversion rate and $80 average order value, you're adding 50 conversions per month. That's $4,000/month. $48,000/year.
For a B2B site generating leads, the impact is similar. Faster pages improve form completion rates. Better mobile experience increases mobile conversions. Improved SEO rankings drive more qualified traffic.
This is the kind of unglamorous automation that actually moves metrics. It's not sexy. It doesn't involve GPT-4 or generative models. It's a Python script and some image processing libraries. But it works.
If your site has 100+ images and you've never optimized them, you're leaving money on the table. The images are slowing down your site, hurting your SEO, and costing you conversions. Every day you don't fix this, you're paying an opportunity cost.
The good news: it's fixable. Whether you build it yourself, use tools, or hire someone, the problem has a solution. And once it's solved, it stays solved.
Thinking about AI for your business?
If this resonated — if you read this and thought "we probably have this problem too" — let's have a conversation.
I do free 30-minute discovery calls where we look at your operations and identify where AI could actually move the needle. Sometimes it's image optimization. Sometimes it's product creation, pricing, SEO, customer service. Sometimes it's not AI at all — it's a workflow problem that needs a process fix.
The call is straightforward. You show me your business, I tell you what I see, we figure out if there's a fit. No pitch deck, no sales pressure. Just a conversation between people who both have limited time and want to use it well.
Get AI insights for business leaders
Practical AI strategy from someone who built the systems — not just studied them. No spam, no fluff.
Hodgen.AI
Ready to automate your growth?
Book a free 30-minute strategy call with Hodgen.AI.
Book a Strategy Call