Building a Screen Recording App in Swift with ScreenCaptureKit
How I built a ScreenCaptureKit Swift app with webcam overlay, mic capture, and auto-zoom. A custom alternative to Screen Studio for $0.
By Mike Hodgen
When I started building an autonomous demo video pipeline — where Claude scripts product demos, Playwright performs them in a browser, and the whole thing runs without me touching it — I hit a wall. I needed a ScreenCaptureKit Swift app that could record the screen on command, overlay a webcam circle, capture microphone audio, and be triggered programmatically from a script. Nothing on the market did all of that without compromise.
So I built it.
Why I Built a Screen Recorder Instead of Buying One
The $89 Problem
Screen Studio is a beautiful app. It costs $89/year. It produces polished demo videos with smooth zoom effects, pretty window chrome, and webcam overlays. For most people, it's worth every penny.
But Screen Studio is a GUI app. You click buttons. You manually start and stop recordings. There's no CLI, no API, no way to hook it into an automated pipeline. And it's built on Electron — a screen recording app running inside a web browser runtime. That bothered me more than the price.
OBS is free but designed for livestreamers. The interface is a cockpit. QuickTime can record your screen but gives you zero control over webcam compositing, audio mixing, or output format.
What I Actually Needed
My requirements were specific:
- Menu bar app — no dock icon, no window taking up space
- One-click recording with a global keyboard shortcut
- Circular webcam overlay in the corner for demo personality
- Microphone capture mixed with system audio
- Auto-zoom on mouse clicks for that polished demo look
- CLI interface so Playwright scripts could trigger recordings programmatically
That last one killed every existing option. When a tool costs more than a few hours of building time and you need custom behavior it doesn't support, the calculus flips. This is the same pattern I followed when I built my consultancy site in a day instead of wrestling with a page builder. Build what you need, own the result.
The specific features Screen Studio charges for — webcam overlay, zoom effects, pretty window chrome — most of that is achievable with ScreenCaptureKit and AVFoundation in a weekend. So that's what I did.
ScreenCaptureKit Architecture: What Apple Gives You for Free
Apple introduced ScreenCaptureKit in macOS 12.3 and substantially improved it in macOS 13 and 14. It's the modern replacement for the old CGDisplayStream API, and it's genuinely well-designed.
 ScreenCaptureKit Capture Pipeline Architecture
SCStream and SCContentFilter
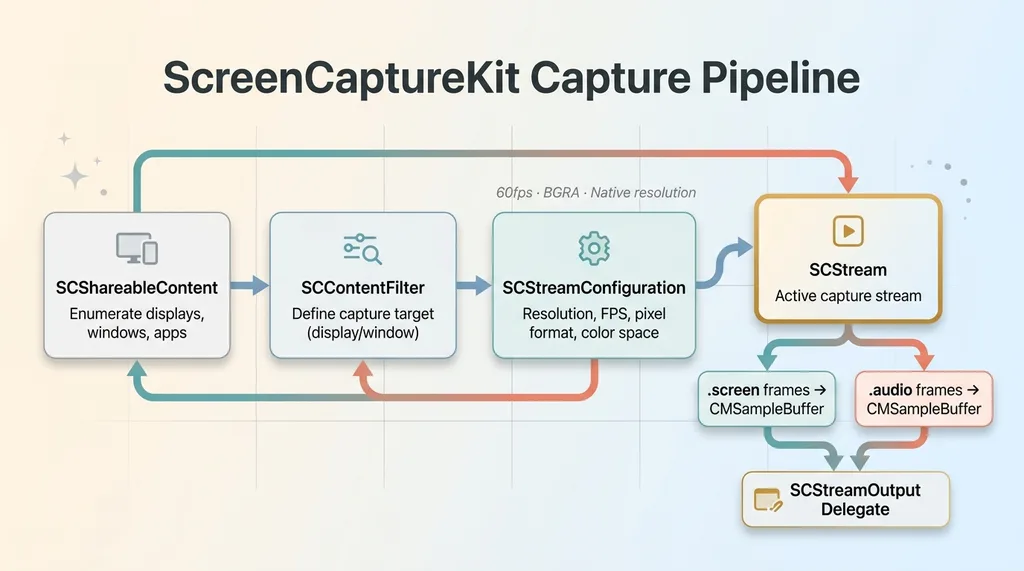
The core objects form a clean pipeline:
- SCShareableContent — enumerate available displays, windows, and running applications
- SCContentFilter — define what to capture (a specific display, a window, or a set of windows)
- SCStreamConfiguration — set resolution, frame rate, pixel format, color space
- SCStream — the actual capture stream that delivers frames to your delegate
You create a filter, configure the stream, attach an output delegate, and call startCapture(). Frames arrive as CMSampleBuffers in your delegate callback.
The Capture Pipeline
I configured my stream for 60fps at native resolution using BGRA pixel format. The key architectural decision: capture the entire display rather than a specific window. I need to record whatever I'm demoing — a browser, a terminal, Finder — not a predetermined window.
let config = SCStreamConfiguration()
config.width = displayWidth * scaleFactor
config.height = displayHeight * scaleFactor
config.minimumFrameInterval = CMTime(value: 1, timescale: 60)
config.pixelFormat = kCVPixelFormatType_32BGRA
The delegate receives stream(_ stream: SCStream, didOutputSampleBuffer: CMSampleBuffer, of type: SCStreamOutputType) calls. You get separate callbacks for .screen and .audio types, which makes routing clean.
Permissions and Entitlements
ScreenCaptureKit requires Screen Recording permission in System Preferences. For non-sandboxed apps (which mine is — sandboxing a screen recorder is a contradiction), you skip the entitlement dance but still need to handle the permission prompt gracefully.
One thing worth noting: ScreenCaptureKit is async/await native. The enumeration APIs, stream start/stop — all async. This makes the Swift code clean but means you need to think about MainActor isolation carefully. I burned about 30 minutes on a purple runtime warning because I was updating UI state from a non-main-actor context inside a stream callback.
Adding Webcam Overlay and Microphone Capture
This is where it gets interesting and where Screen Studio earns most of its $89.
AVCaptureSession for the Camera
The webcam runs on a completely separate capture pipeline from ScreenCaptureKit. I use AVCaptureSession with an AVCaptureDeviceInput for the FaceTime camera (or whatever external camera is connected). This session runs independently, delivering its own CMSampleBuffers on its own timing.
The preview renders into a small circular NSView positioned in the bottom-left corner of the screen. The circular mask is just CALayer with cornerRadius = width / 2. Simple, effective, and it looks exactly like Screen Studio's webcam bubble.
Compositing the Circular Overlay
For the live preview, the webcam sits in its own NSView layered on top of everything. But for the actual recording file, you need to composite the webcam frame onto the screen capture frame before writing to disk.
 Frame Compositing Pipeline — Screen + Webcam + Zoom
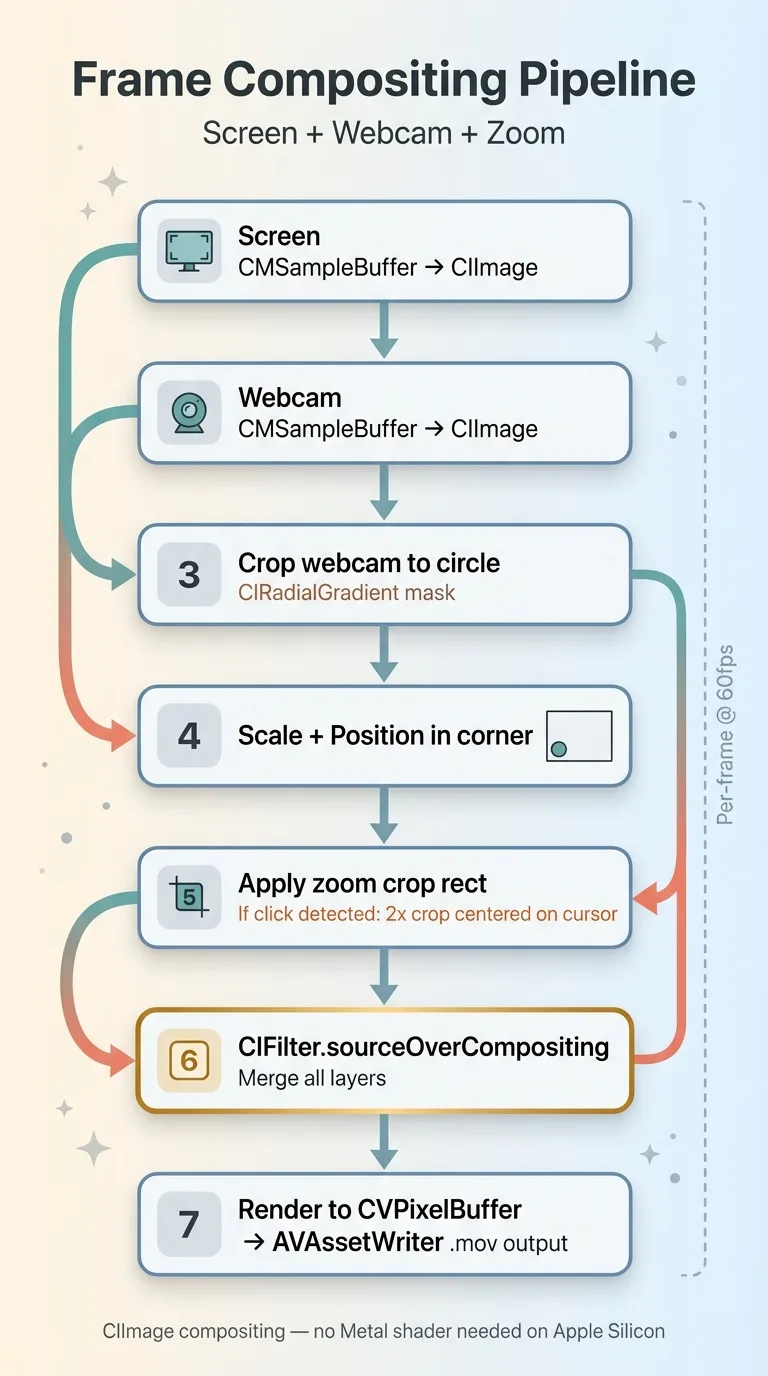
I use CIImage compositing for this. Each time a screen frame arrives:
- Convert the screen CMSampleBuffer to a CIImage
- Convert the latest webcam frame to a CIImage
- Crop the webcam image to a circle using CIRadialGradient as a mask
- Scale and position it in the corner
- Composite using
CIFilter.sourceOverCompositing - Render the final CIImage back to a CVPixelBuffer
- Write to AVAssetWriter
A Metal shader would be faster, but CIImage compositing runs comfortably at 60fps for 1920x1080 output on any Apple Silicon Mac. I optimized for build speed, not render speed.
Audio Capture With SCStream
ScreenCaptureKit captures system audio natively — just add a stream output with .audio type. But microphone input requires a separate AVCaptureDevice for the audio input. So I'm running two audio streams: system audio from ScreenCaptureKit and mic audio from AVCaptureSession.
Both streams feed into separate AVAssetWriterInput channels on the same AVAssetWriter. The gotcha that cost me an entire afternoon: audio sync. The screen capture and mic capture have different clock sources. Their timestamps don't align automatically.
The fix: use CMSampleBufferSetOutputPresentationTimeStamp to rebase both audio streams relative to a shared start time captured at the moment recording begins. Without this, the mic audio drifts by 50-200ms from the screen capture over a 5-minute recording. Subtle but noticeable.
Auto-Zoom: The Feature That Makes Demos Look Professional
Auto-zoom on click is the single feature that separates amateur screen recordings from professional demos. When you click something, the camera smoothly zooms in to show the detail, then eases back out. It's what makes Screen Studio demos look so polished.
 Auto-Zoom Click Detection and Crop Strategy
Tracking Mouse Position With CGEvent
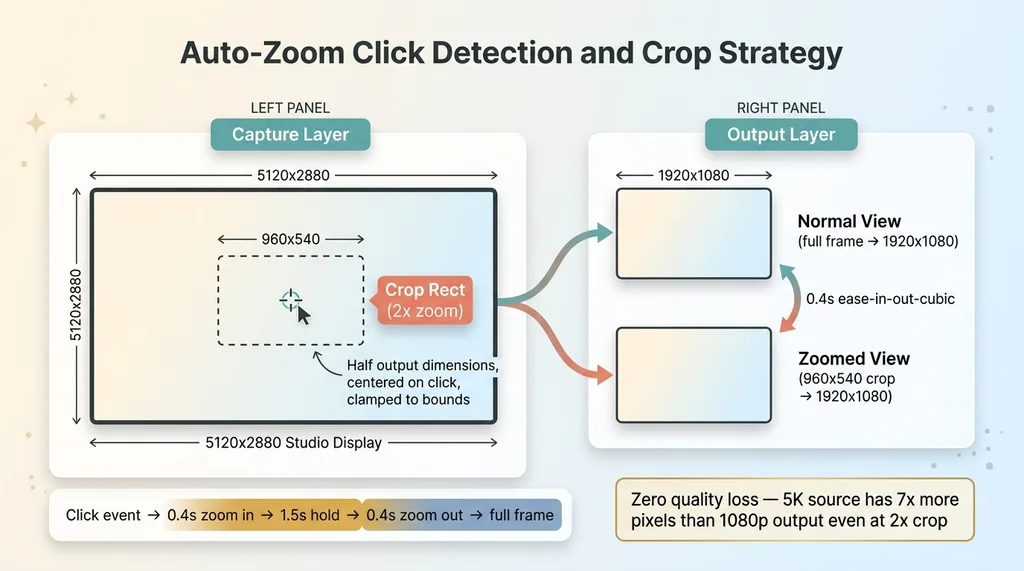
I use CGEvent.tapCreate to monitor mouse click events globally. On each click, I capture the cursor position and calculate a crop rect centered on that point.
The crop rect is half the screen dimensions (2x zoom). So on a 1920x1080 output, the crop rect is 960x540, centered on the click location, clamped to screen bounds so it doesn't try to show pixels that don't exist.
Key insight: you don't zoom the capture. You always capture at full native resolution — 5120x2880 on a Studio Display — and zoom in post by cropping the CMSampleBuffer frames. Since I'm outputting at 1920x1080, a 2x crop from a 5K source still gives me more pixels than the output needs. Zero quality loss.
Smooth Zoom Animation With CADisplayLink
The animation uses a CADisplayLink-driven easing function. On click, the crop rect interpolates from full-frame to the zoomed rect over ~0.4 seconds using ease-in-out-cubic timing. After 1.5 seconds, it eases back to full-frame over another 0.4 seconds.
In the compositing step, I apply the current crop rect:
let cropped = screenImage.cropped(to: currentCropRect)
let scaled = cropped.transformed(by: scaleTransform)
The result is smooth, professional-looking zoom that tracks wherever you click. Took about 2 hours to implement including the easing math.
One catch: the CGEvent tap requires Accessibility permission in addition to Screen Recording permission. That's two system permission dialogs on first launch. Not ideal UX, but unavoidable for global event monitoring.
Menu Bar App: SwiftUI + AppKit Hybrid Architecture
NSStatusItem for the Menu Bar
This app lives in the menu bar. No dock icon, no persistent window. I use NSStatusItem with a simple circle icon — gray when idle, red when recording. The menu provides: Start/Stop Recording (⌘⇧5), toggle webcam overlay, select audio source, open recordings folder.
SwiftUI Settings Window
The settings panel is built in SwiftUI — resolution, frame rate, webcam position (any corner), zoom speed, output directory. But the menu bar itself is pure AppKit. SwiftUI's MenuBarExtra works in theory but has limitations around dynamic state updates that made it unreliable for showing real-time recording duration.
Keyboard Shortcuts With NSEvent
Global keyboard shortcut capture uses NSEvent.addGlobalMonitorForEvents to listen for ⌘⇧5 even when the app isn't focused. Recording state is managed by a simple state machine: idle → preparing → recording → stopping → saving. Each state transition is an @Published property so the SwiftUI settings panel updates in real time.
File output goes to ~/Movies/TakeOne/ with timestamp-based filenames. The whole app is ~2,400 lines of Swift.
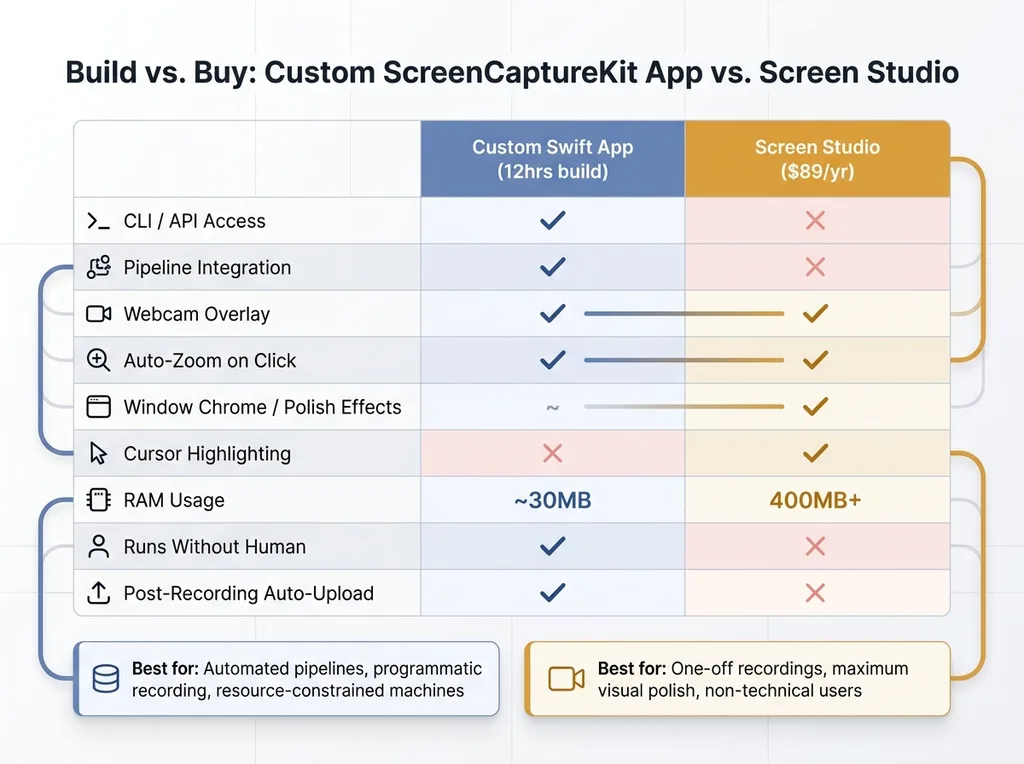
Compare that to Screen Studio, which is a full Electron app. A native Swift screen recorder uses ~30MB of RAM while recording. Electron-based alternatives sit at 400MB+. On a machine that's simultaneously running Playwright, a browser, and whatever I'm demoing, that headroom matters.
What This Cost vs. What Screen Studio Charges
 Build vs Buy — Custom Swift App vs Screen Studio Comparison
Development Time Breakdown
Honest accounting. Total build time: about 12 hours spread across a weekend.
- 3 hours — basic ScreenCaptureKit capture and AVAssetWriter output
- 3 hours — webcam overlay and CIImage compositing
- 2 hours — audio sync debugging (the afternoon I'll never get back)
- 2 hours — auto-zoom with easing animation
- 2 hours — menu bar UI, settings panel, polish
Screen Studio is $89/year. So this "pays for itself" in year one if you value your time at less than ~$7.40/hour. Obviously that math doesn't work if you're just trying to save $89.
The Hidden Costs of SaaS Tools You Don't Control
The real value isn't the $89 saved. It's the capability I now own.
Since the initial build, I've added: a CLI interface for triggering recordings from shell scripts, automatic upload to S3 after recording completes, and integration with my demo video pipeline where Playwright performs the demo and the recorder captures it — all without human intervention.
None of that would be possible with Screen Studio. Not even close.
I'll be honest about the tradeoffs though. Screen Studio's post-processing effects — pretty window chrome, background blur, cursor size increase and highlighting, smooth cursor trail — are genuinely good. Replicating those would take another 20+ hours. For one-off recordings where you want maximum polish, just buy Screen Studio.
For a production pipeline where recordings need to happen programmatically, feed into an automated editing system, and run without anyone watching — build your own. The 12-hour investment compounds every time a recording happens without me.
This is the same philosophy behind everything I build. I don't recommend tools I haven't built alternatives to. I build the tools I recommend because that's the only way to know what's actually possible and where the real constraints are.
Thinking About AI for Your Business?
If this kind of thinking resonates — building exactly what you need instead of duct-taping SaaS tools together and hoping they don't change their pricing — we should talk. I do free 30-minute discovery calls where we look at your operations and figure out where AI or custom tooling could actually move the needle. No slides, no pitch deck. Just an honest conversation about what's possible.
Get AI insights for business leaders
Practical AI strategy from someone who built the systems — not just studied them. No spam, no fluff.
Hodgen.AI
Ready to automate your growth?
Book a free 30-minute strategy call with Hodgen.AI.
Book a Strategy Call